Domains & DNS
DNS provider guides
Where to add DNS records in Cloudflare, GoDaddy, Namecheap, Route 53, Hostinger and Squarespace, plus common mistakes.
Records are added wherever your domain's nameservers point. That's usually where you bought the domain, unless you moved DNS to a service like Cloudflare.
Cloudflare
- Select the domain, then DNS → Records → Add record.
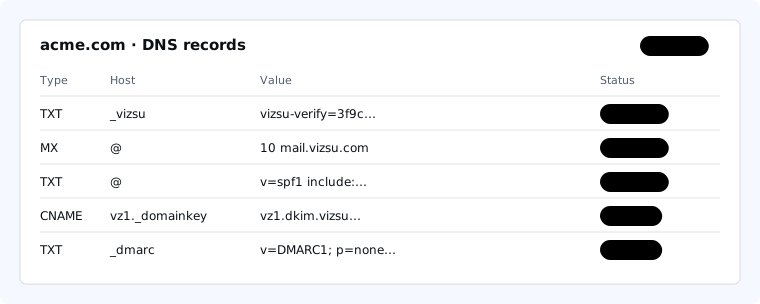
- Enter the Type, Name (host) and Content (value) from your domain page. For MX, set Priority to 10.
- Turn the proxy off. For the
autoconfig,autodiscover,mta-stsand DKIM CNAMEs, click the orange cloud so it turns grey (DNS only).
GoDaddy
- My Products → Domains → DNS, then Add New Record.
- Use the host exactly as shown (
@,_vizsu,v1._domainkey). GoDaddy appends your domain. - Remove old MX records from a previous provider once you are ready to switch.
Namecheap
- Domain List → Manage → Advanced DNS.
- Add TXT and CNAME records under Host records.
- For MX, set Mail settings to Custom MX first, then add the record with priority 10.
Amazon Route 53
- Hosted zones → your domain → Create record.
- Enter the name prefix in Record name (leave it blank for
@). - Wrap TXT values in double quotes. MX values are written
10 mail.vizsu.com.
Hostinger
- Domains → your domain → DNS / Nameservers → DNS records.
- Choose the type, enter Name and value, and Add Record. Delete Hostinger's default MX records when you switch.
Squarespace
- Domains → your domain → DNS → DNS Settings, then Add record under Custom records.
- Remove any Google Workspace preset if you are moving off it.
Common mistakes
- Doubled domain: entering
_vizsu.acme.comwhere the provider appends the domain creates_vizsu.acme.com.acme.com. - Two SPF records: merge them into one.
- Proxied CNAMEs on Cloudflare: switch to DNS only.
- Old MX records left in place: mail is split between providers.
- Edited the wrong place: if your nameservers point elsewhere, records added at the registrar are ignored.
- Truncated values: use the copy button rather than selecting text.